Installation Steps: Mantra MFS 100 Device
Leegality’s secure virtual sign supports fingerprint-based e-signing using the Mantra MFS 100 biometric device.
In order to use the biometric device in the signing journey, you will need to connect the device to your computer/mobile and download the necessary drivers/helper app. This document sets out the prerequisite steps for using the Mantra MFS 100 device in eSign journeys.

Note: We currently support devices running Windows or Android. MacOS and iOS support are not available for Mantra MFS 100.
To download the client Service drive click here.
Note: To download the latest windows MFS100 Driver click here.
Windows Devices
Step 1: Download the Client Service Driver from the Resources section above. Connect the Mantra MFS 100 biometric device to your computer.
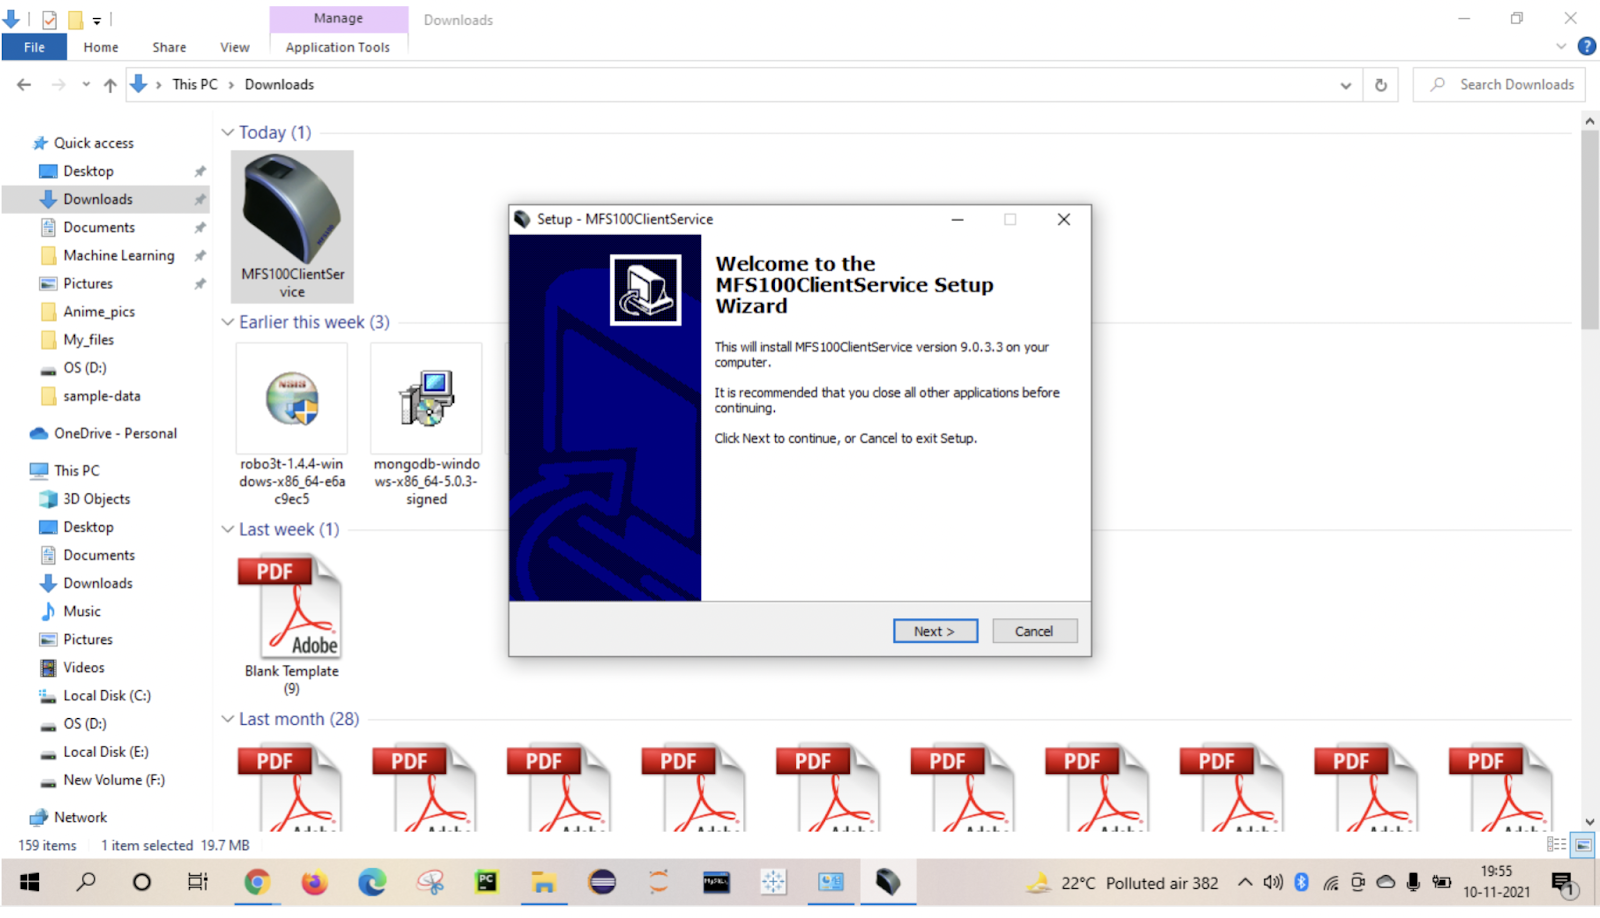
Step 2: Run the downloaded file as an administrator.

Step 3: Click on "Next" to proceed to Installation
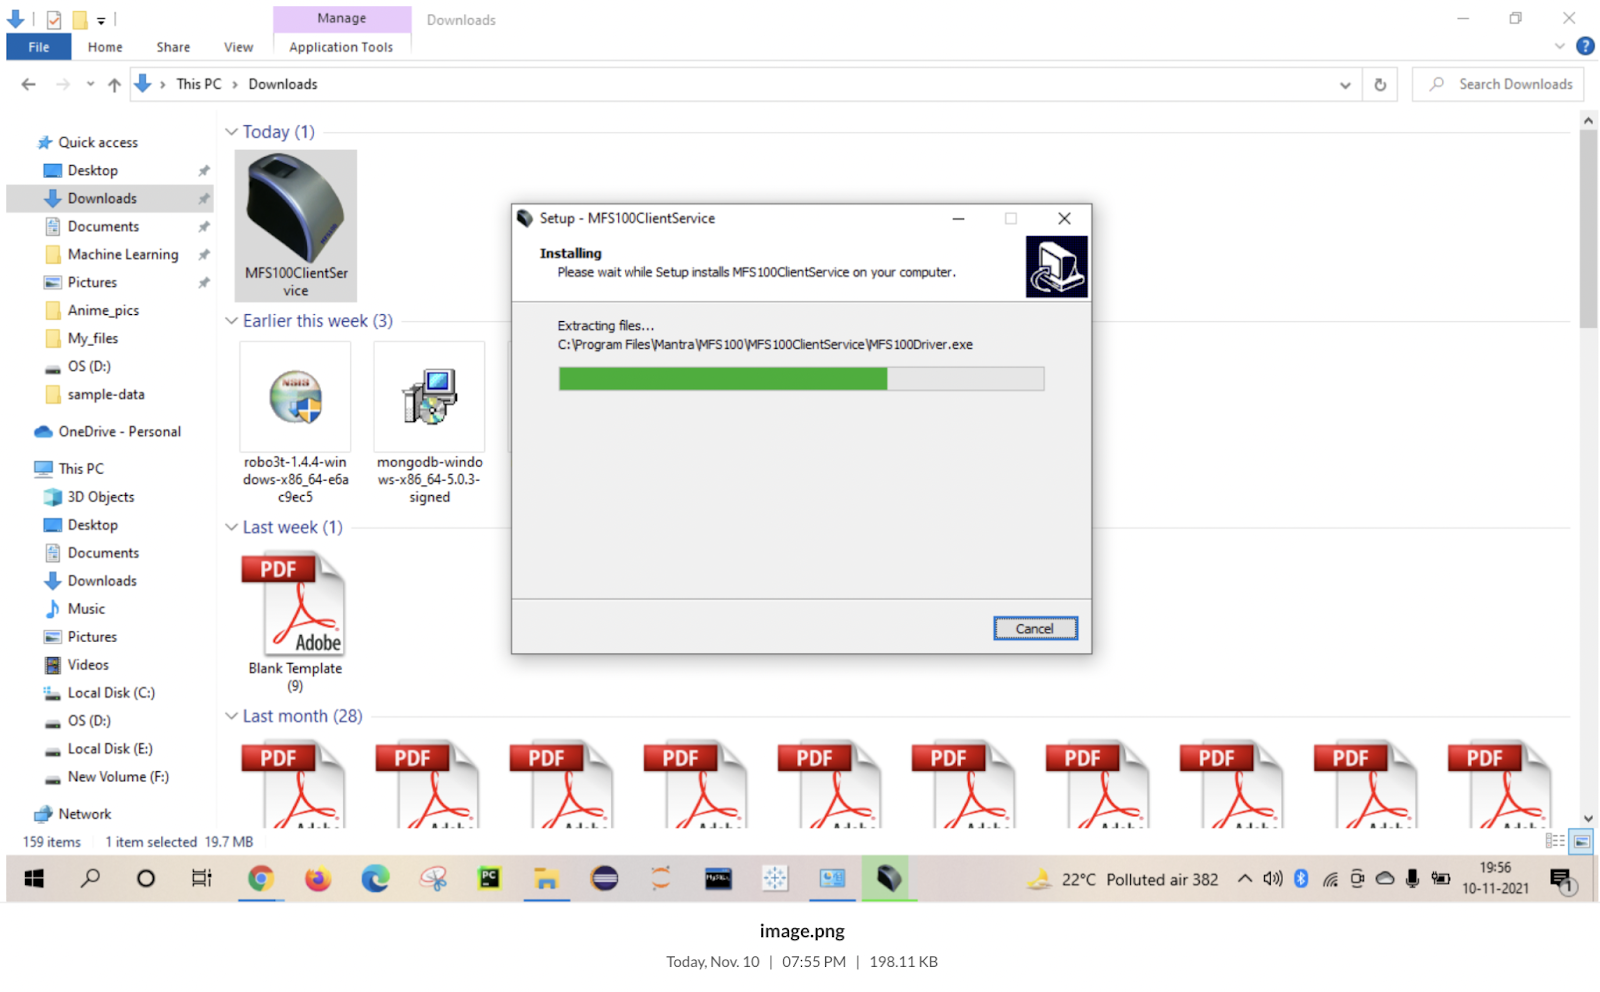
Step 4: Click on Install to install the Client Service.

Step 5: After clicking on Install in the step above, the system will start installing the Client Service.
Step 6: While installation is in progress, the system will automatically prompt you to install the MFS 100 Driver. Click on Next.

Step 7: Click on Install

Step 8: On finishing the installation of the driver, the MFS 100 Test Application window should pop up. Click on “Initialize” and then click on “Start Capture”. At this stage, the biometric device will flash a light.

Step 9: Place your finger on the scanner of the device - an image of the fingerprint should appear on the white box in the MFS 100 Test Application window.
Step 10: Click on Finish to complete the client service setup.

Step 11: You can now open the signing link on your laptop. Leegality will be able to automatically detect the biometric device when you reach the biometric signing page.
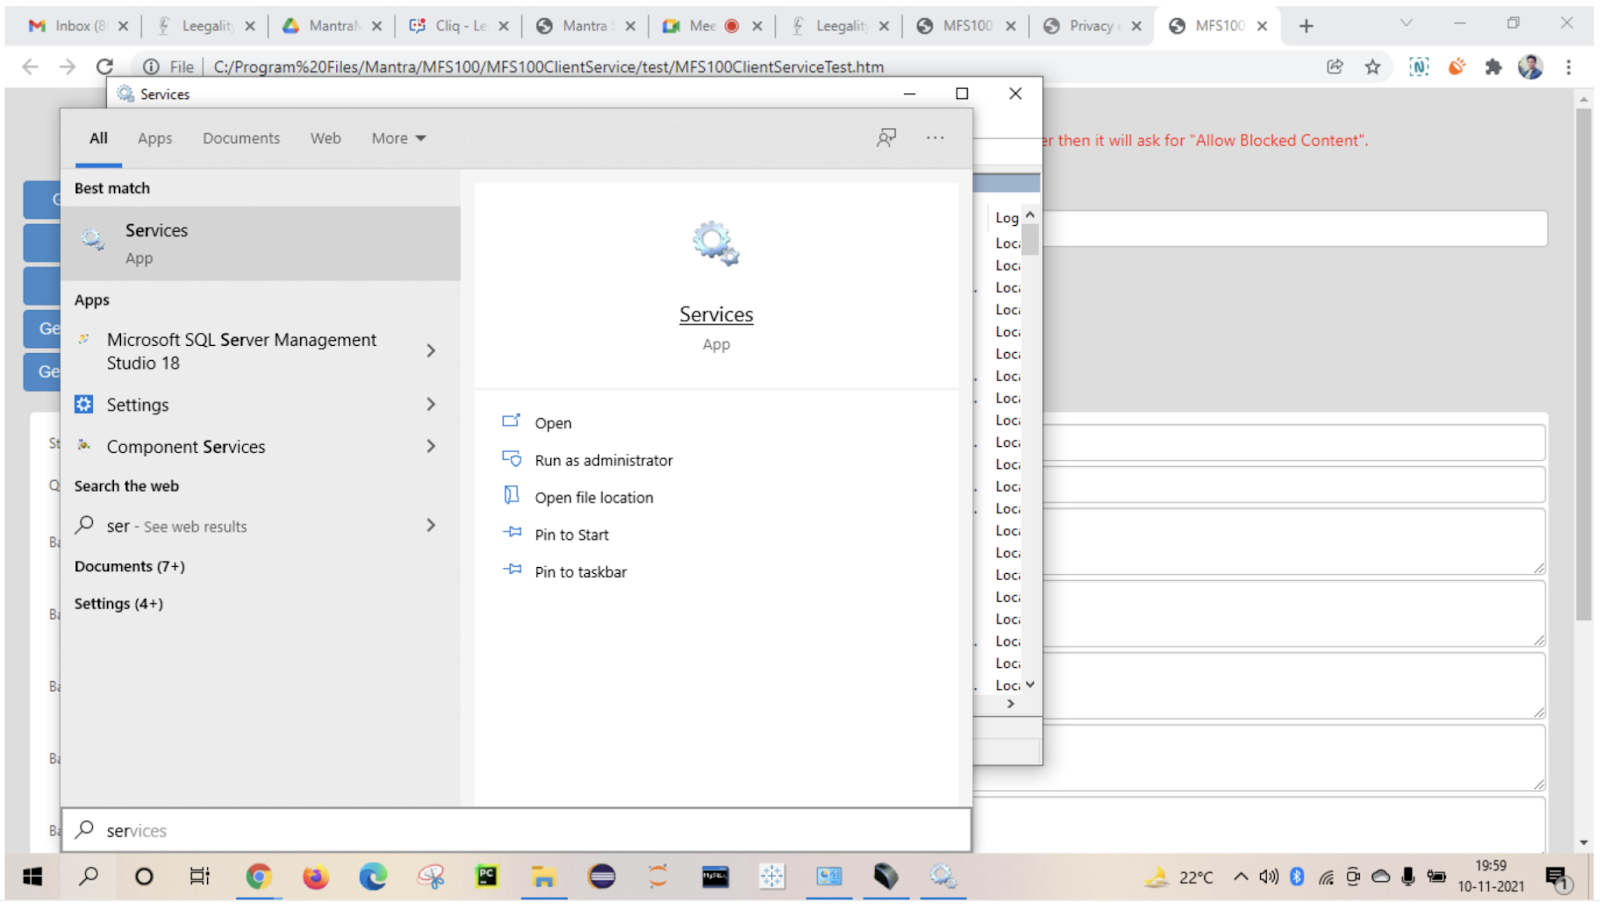
Step 12: Troubleshooting: In case the Leegality biometric signing page is unable to detect the biometric device, click on the Windows (Start) button and search for “Services”. Run Services as an administrator.
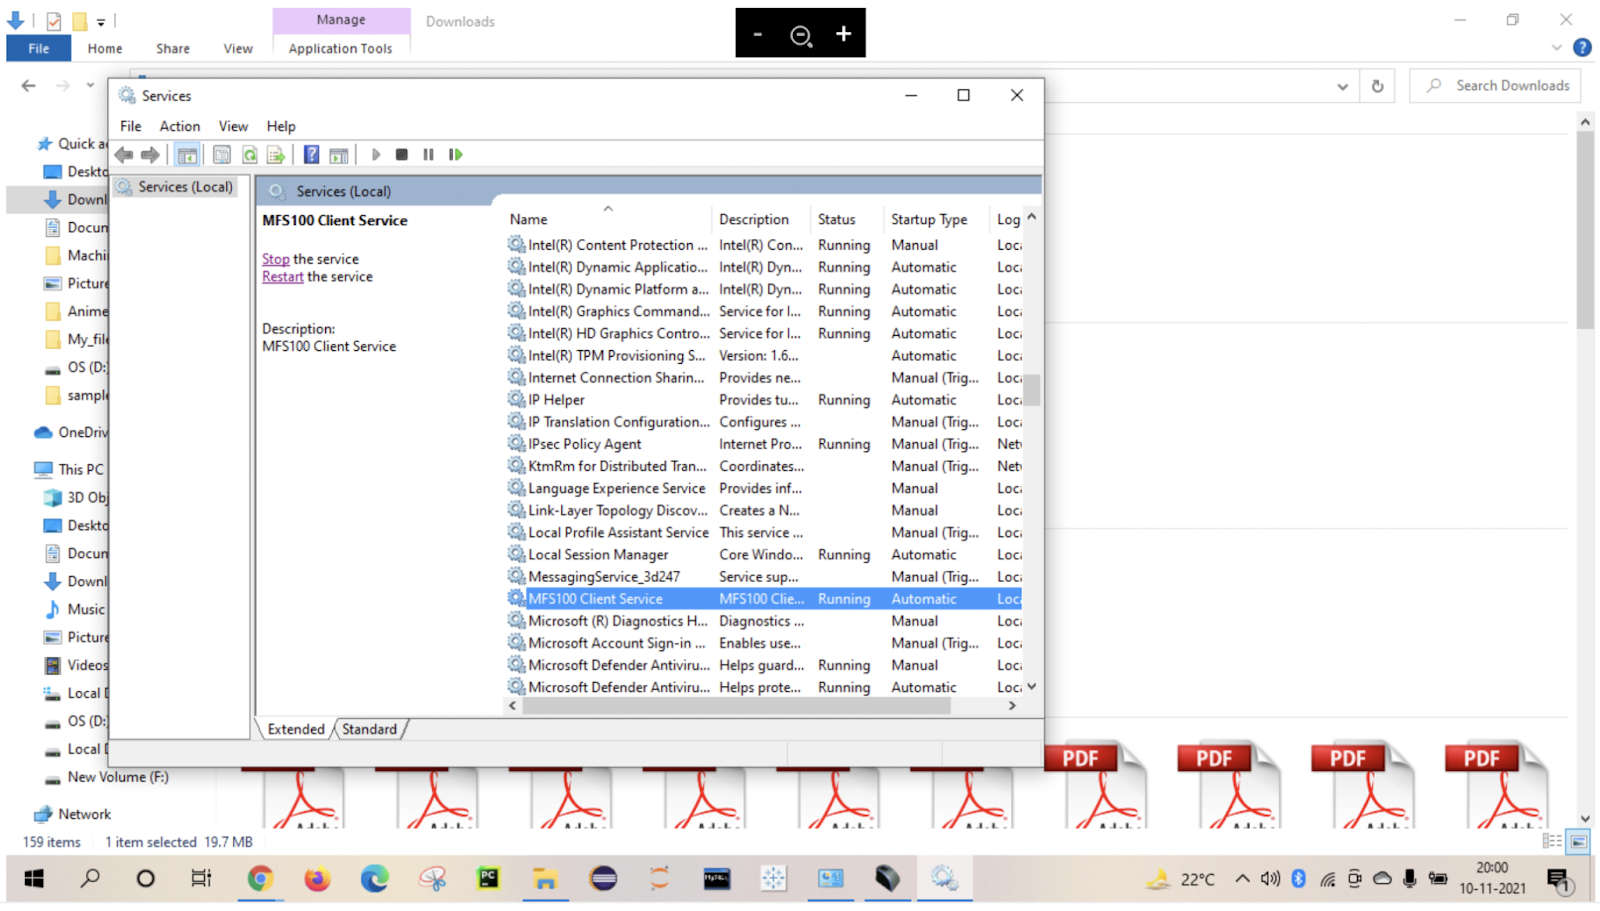
Step 13: Troubleshooting (Contd): In the Services window, search for “MFS100 Client Service” and ensure it is running. If you are facing issues, click on Restart service.
Android Devices
1. Download the Leegality Helper Application from the Google Play Store on your Android device. (https://play.google.com/store/apps/details?id=com.gspl.leegalityhelper)
2. For a smooth interface, ensure that the client android application automatically opens the eSigning URL in the Leegality Helper Application. See the sample code snippet below.

See the helper app documentation below for additional details. Please reach out to your Leegality customer success manager for the latest version of the Helper App Documentation before proceeding with integration.
3. Ensure that the biometric device is connected to your device. When you reach the biometric signing page, the biometric device will be automatically detected.
Helper App Documentation -Leegality Android Helper App
1. Download Leegality Helper Application from https://play.google.com/store/apps/details?id=com.gspl.leegalityhelper
2. Client Android Application has to submit the eSigning URL to Leegality Helper Application. Please check the below snippet :
Note: It is recommended to start the signing process by using startActivityForResult instead of startActivity to receive the response/error.
Result:
Override method onActivityResult to check the response of the signing process.
1. In case of successful completion of the signing process, the signing window will be closed automatically and you will get a response with the key name 'message' and corresponding 'success message' in the Intent.
2. In case of an error in the signing process, signing window will be closed automatically and you will get a response with the key name 'error' and corresponding 'error message'.
Additional Source
Please click here for the installation manual in detail.
Related Articles
Installation Steps: Morpho RD Services
Leegality’s Aadhaar sign supports fingerprint-based e-signing using the Morpho 1300 E3 biometric device. In order to use the biometric device in the signing journey, you will need to connect the device to your computer/mobile and download the ...Fingerprint Capture - Virtual Sign
Introduction Affix fingerprint type is the third subtype of Leegality’s Virtual Signature type that allows for users to sign using their fingerprint via a registered biometric device connected to a Windows PC or Android Mobile phone. How to activate ...Fingerprint Capture - Aadhaar Esign
Leegality’s Aadhaar Signature type allows users to sign using their fingerprint via a registered biometric device connected to a Windows PC or Android Mobile phone. Steps to activate Aadhaar biometric sign type Step 1: Click on the “Account” option ...Steps for Downloading Aadhaar XML
Step 1: Visit the webpage:https://myaadhaar.uidai.gov.in/offline-ekyc Step 2: On the webpage, click on “Login”. Step 3: Enter “Aadhaar Number” and the “CAPTCHA (Security Code)” visible on the screen and click on “Send OTP”. Step 4: Enter the OTP ...Steps for Creating Signer ID using PAN
Visit https://esign.e-mudhra.com/UI/createNewUser.jsp Enter your Full Name, Mobile Number, Email ID, and a 6 digit PIN. Note the PIN in a secure manner, as it will be required at a later stage for using the SignerID. After entering the above details, ...