Steps for Creating Signer ID using Aadhaar- Verasys
Step 1: Please click on the below link to create PAN based KYC account.
Step 2: Now click on PAN KYC button.
Step 3: Fill all the appropriate details accordingly. The PAN Number and the Applicant’s Name, which should match with PAN card.
Step 4: Enter your Mobile number which is active, Now Click on SEND OTP then you will receive an OTP on the given Mobile number.
Enter the OTP in the given field box.

Note:- (You can also Verify your Mobile number Later)
Step 5: Enter your Email id which is active, Now Click on SEND OTP then you will receive an OTP on the given Email Address.
Enter the OTP in the given field box.
Note:- (You can also Verify your Email id Later).
Step 6: Fill all other appropriate details.
Step 7: Now you need to set your 6 Digit Account PIN which will be required while doing e-Sign.
Step 8: Upload / Attach all the required documents for KYC.
Note: Upload image only .jpg / .jpeg /.png /.pdf files and must be clearly visible.
Step 9: Attach your Passport size photograph.
Note: (Photo should be taken within the last six months / Image size should not be more than 500KB).
Step 10: Attach your PAN Card.
Note: (Face should be clearly visible in Pan Photo / Contents of the PAN Card should be clearly readable / File size should not be more than 2MB).
Step 11: Attach Address Proof, from the below given documents.
Note: (File size should not be more than 2MB)
Step 12: After attaching all the required documents.
Step 13: Click on the checkbox & tick, give your confirmation. Now click on NEXT.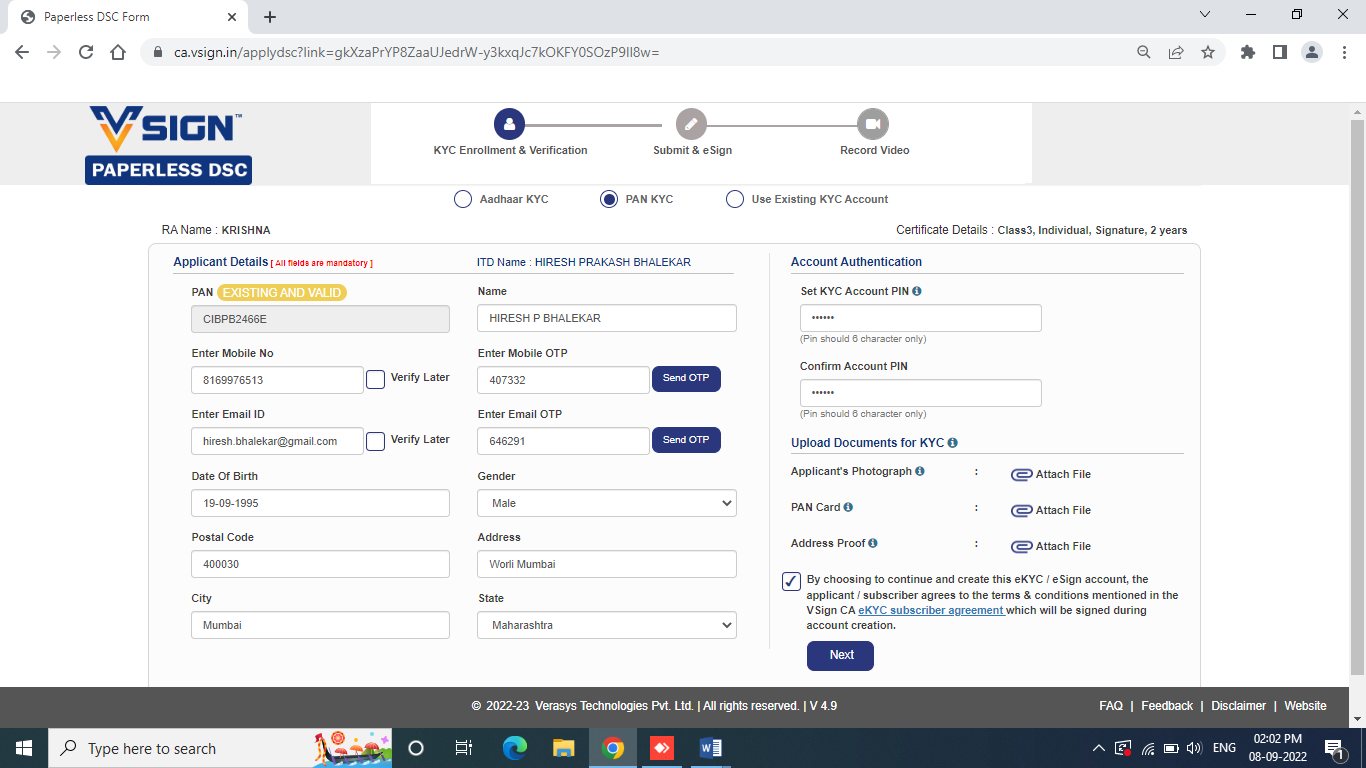
Step 14: Check your Name again it should be same as on PAN card. And now click on Proceed.
Step 15: Now you have to set a passcode.
Note: The same passcode, set by you will be received on the registered mobile number on Whatsapp or normal text message.
Step 16: Now click and tick the check box and give your consent. Also click Submit & eSign DSC to sign.
Note: After this you will receive a Email & Message of (Vsign EKYC Account registered successfully.
Step 17: Click OK. And then you will receive an OTP on your registered Mobile Number.
Step 18: Enter received OTP and PIN set by you to eSign the document. And you will also receive a Link for Video Verification on your Email id.
Step 19: Click on Sign Documents.
Step 20: Now you have to record a Video for Verification. Click on Record Video Now.
Step 21: Applicant needs to record the video to activate his PAN KYC account.
Please read the script mentioned on the screen properly and applicant needs to show his PAN and address proof clearly in the video.
Step 22: Click on Record and click to proceed.
Step 22: Click allow to give permission for Camera and Microphone.
Step 23: After recording video successfully click on Submit.
Step 24: Click OK.
Step 25: Once the video is recorded successfully and submitted, we will verify the video and uploaded documents to activate the Pan KYC account.
Related Articles
Steps for Creating Signer ID using Aadhaar XML
Visit https://esign.e-mudhra.com/UI/createNewUser.jsp Enter your Full Name, Mobile Number, Email ID, and a 6 digit PIN. Note the PIN in a secure manner, as it will be required at a later stage for using the SignerID. After entering the above details, ...Steps for Creating Signer ID using PAN
Visit https://esign.e-mudhra.com/UI/createNewUser.jsp Enter your Full Name, Mobile Number, Email ID, and a 6 digit PIN. Note the PIN in a secure manner, as it will be required at a later stage for using the SignerID. After entering the above details, ...Steps for Creating Signer ID using PAN - Verasys
Step 1: Please click on the below link to create PAN based KYC account. Link: https://ekyc.vsign.in/ekycpanenrollmentpage Step 2: Please click on the check box to tick (I have read and understood and agree to the above.) Step 3: Fill all the ...Cloud DSC
Cloud DSC is a way to apply IT Act-compliant digital signatures, without having to possess a physical token that is necessary for traditional DSC token-based signing. Users can simply complete a 100% online, one-time verification process, following ...Fingerprint Capture - Aadhaar Esign
Leegality’s Aadhaar Signature type allows users to sign using their fingerprint via a registered biometric device connected to a Windows PC or Android Mobile phone. Steps to activate Aadhaar biometric sign type Step 1: Click on the “Account” option ...