Invitee Rejection
Activating Invitee Rejection functionality
Step 1: Click on the “Account” option then go into the ‘Department’ tab and then click on the ‘Invitee configurations’’

Configuring Invitee rejection in the new document flow or workflow:
Once the document is created or while creating the workflow, on the invitee page click on “Invitee level options”
Under more options toggle on “Allow signer to reject document in signing journey” to enable the feature for invitee rejection
Also, toggle on “ Enforce message collection in case of rejection” which allows the signer to write the reason for rejection.


Note: Invitee rejection option cannot be enabled for automated sign and Nesl sign
Invitee Rejection Journey
Step 1: An Invitee will need to access their email or phone to eSign or reject the document. The Email invite looks like this:

Step 2: After opening the signing link by clicking on the “sign” option from the email or by directly clicking on the link from the phone.


Step 5: Enter the reason for rejection and click on “Reject document”

 Note: Once the document is rejected by the signer, the signing link would not be accessible.

Reactivating the rejected document
Step 1: On your Leegality homepage Go to the “Sent” folder under the “My documents” section.

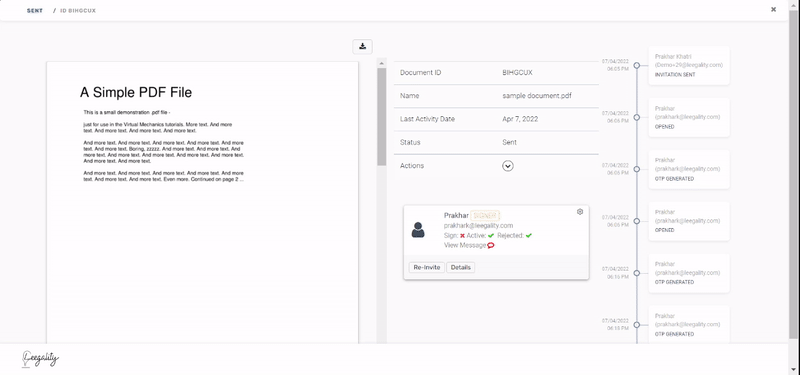
Step 2: Double-clicking on the required document will lead you to the details page.

Step 3: Click on the option “view message” to view the reason mentioned by the signer while rejecting the document.

Once the rejected document is reactivated by the sender, the signer will receive the signing invitation again via email or phone

Related Articles
Invitee level options
“Invitee level options” provide various options to further modify the signing journey for the particular invitee. By using “Invitee level options”, the sender of the document can set the retry attempts for Aadhaar signing, prioritize Aadhaar ...Group Invitee
Group Invitee allows the sender to send signing invites to a group of authorized signatories. Using this feature, anyone or all signers in one group can sign the document, thus, reducing the dependency on a single signer. Activating the Group Invitee ...Require invitee to upload supporting documents
By enabling the option “Require invitee to upload supporting documents” you can request the signer/reviewer to upload documents while signing/reviewing the document. The name of the document has to be provided for every document that is added to the ...Reviewer Role
Description The reviewer role is a non-signing invitee type where the invitee either approves or rejects a document sent to them. The purpose of this invitee type is to allow the sender to ensure that there is a review of the document before the same ...CC
Introduction The CC feature allows you to add contacts to the document journey who may or may not be signers/reviewers in the document but who need to receive updates (as configured by the sender) in order to remain privy to the progress of the ...