Two-factor Authentication (2FA) during signing
Description
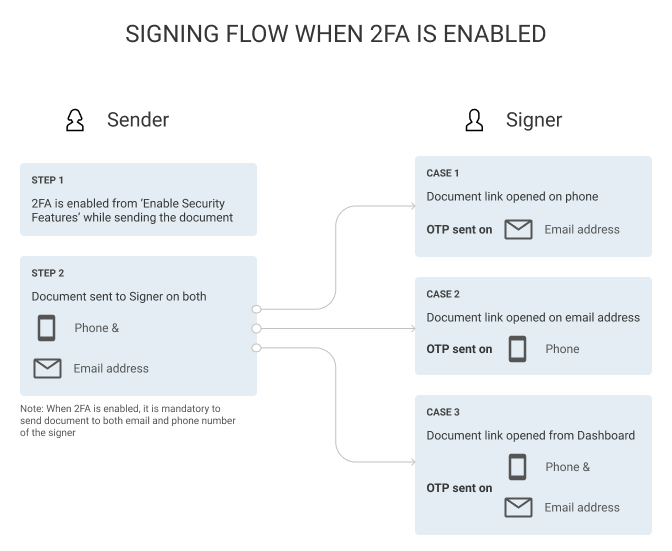
Two-factor Authentication (2FA) during signing is a security feature that ensures the authenticity of the signer of a document.
2FA mandatorily requires a sender to specify both the email address and the phone number of the signer. The signatory will receive the document signing link on both email and phone number. The signatory can open the document signing link from either device. If they open it from their phone number, they will receive authentication OTP on their email address. If they open it from their email address, they will receive authentication OTP on their phone number. In case they get the signing link from the Dashboard (i.e., not email or phone number), then they will receive authentication OTP on both email address and phone number.
The below infographic explains the flow for the signer when 2FA is enabled.
Using 2FA from Dashboard (New Document)
Visit the Invitees page
Click on ‘Invitee level options’
Toggle on ‘Enable Security features’
Toggle on “Require '2 - factor authentication' before document preview”
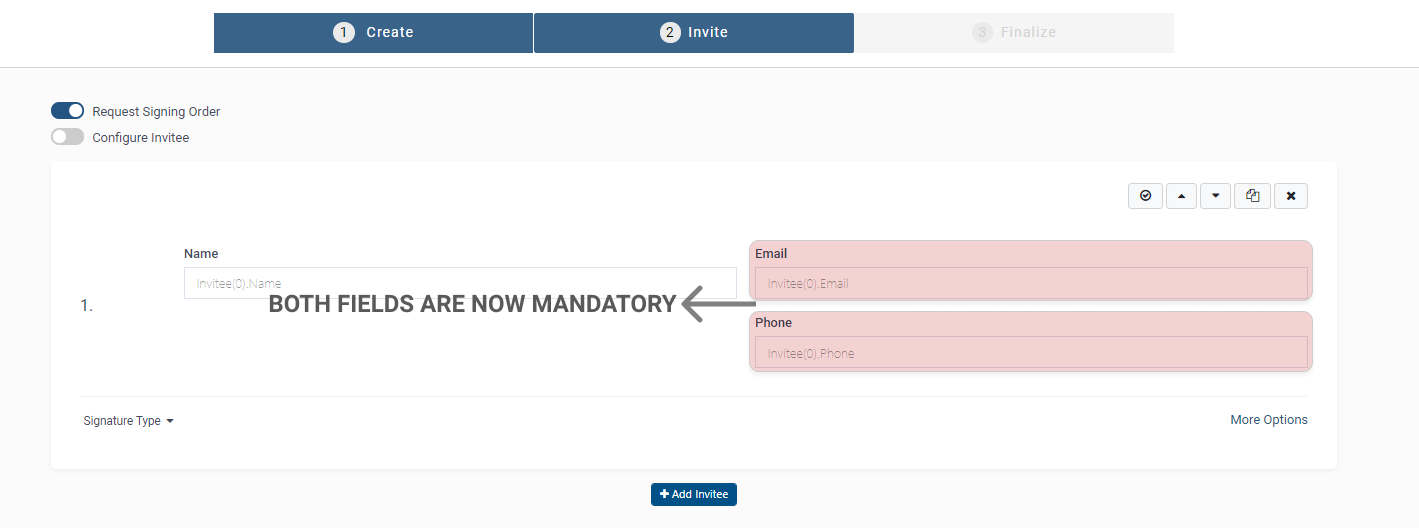
This will open up both email and phone fields for you to enter for the signatory. Entering both the fields is mandatory in case of 2FA flow.
The signatory will now receive the document signing link on both email and phone number. They can open the document signing link from either device.
If they open it from their phone number, they will receive authentication OTP on their email address.
If they open it from their email address, they will receive authentication OTP on their phone number.
In case they get the signing link from the Dashboard (i.e., not email or phone number), then they will receive authentication OTP on both email address and phone number.
Using 2FA in Workflows (during creation of Workflow)
Follow the normal steps of Workflow configuration (see link)
Visit the Invitees page
Click on ‘More options’
Toggle on ‘Advanced Security Features’
Toggle on “Require '2 - factor authentication' before document preview”
This will open up both email and phone fields for the signatory. If you are ‘Configuring invitee’ during the stage of Workflow creation, then you can enter both the fields at this step. In case you want to allow the Workflow User to enter these fields, leave the ‘Configure Invitee’ toggle off. Do note that Workflow User will have to mandatorily enter both of these fields.
Using 2FA in Workflows (during the running of Workflow through Dashboard)
If your Workflow creator has enabled 2FA setting for any invitee, then it becomes mandatory for the Workflow user to enter both email address and the phone number of the invitee.
Using 2FA in Workflows (during the running of Workflow through Excel Upload)
If your Workflow creator has enabled 2FA setting for any invitee, then it becomes mandatory for the Workflow user to enter both email address and the phone number of the invitee when performing Excel Upload.
Making 2FA mandatory for your Organization
For security reasons, some organisation may prefer that all the documents sent from their accounts are protected using 2FA. This setting is supported in our application and can be enabled by the Organisation Administrators. The steps for making 2FA mandatory for all documents sent by anyone in the organisation are as follows:
Visit Account
Click on Department (from the left-side panel)
Visit Security Tab
Toggle on ‘Enforce 2 - Factor Authentication before document preview’

Now all documents sent from any account in the organisation will be protected with 2FA and will require both email and phone number during the sending journey.
More resources
Related Articles
Multi Factor Authentication (MFA)
With Multi-Factor Authentication (MFA), you can add an authentication layer on top of the existing OTP/Password while logging into a Leegality account - to further safeguard against unauthorized access of Leegality from within your organization. ...Signing Options
Each ‘Signature Type’ has its own options that can be accessed by clicking the ‘gear’ icon. Aadhaar Aadhaar authentication can be configured to take place via an: OTP Verification Biometric Verification Iris Verification The Aadhaar certificate ...Signing Journey Options
“Signing journey options” are to further modify the signing journey for all the invitees. By using “Signing journey options”, the sender of the document can: 1. Set the expiry of the document 2. Send a custom message with an invitation 3. Enclose the ...DSC Token - Signing Journey
Prerequisites for signing via Leegality using a DSC Token:- Leegality DSC Utility should be downloaded and running as administrator: Download link: ...Webhook Authentication
Webhooks enable the communication of invitation status and signed documents to your application. Previously, a standard webhook structure was available for such needs. You may also add additional header parameters to the webhook calls for ...